How To Resolve Kernel Panic Error After Installing A New Kernel
Kernel panic after installing a new kernel” is a situation that most of the people (admins/staff) who manages a Linux box would have come across or heard off. So, “how to resolve kernel panic error after installing a new kernel” or “kernel panic after system updates” would be the keywords that we most of us hit on internet search engine… Google to check for solution. This happened with me as well, and I had to look out for a proper solution and did a lot of research about this. Hence, I wanted to document about some facts about kernel package, some prerequisites to be checked before installing new kernel, various methods used to cross-check if new kernel is successfully installed etc., which could help someone looking out for an answer/solution regarding this. There may be a situation where a system fails to boot into new kernel and shows some other errors and it may not be a panic message.
Before showing on how to recover from kernel panic situation after installing new kernel, let’s understand the following topics
What does a kernel package would install?
What is the best practiced way of installing a new kernel package?
What are the few precautions or checks that has to followed before loading a new kernel?
Which are the important configuration files that system would edit or make modifications after the installation of a kernel package?
Where to look out for error logs in case something goes wrong while loading a new kernel?
What does a kernel package would install?
Mainly it would install:
Modules/drivers
an initramfs file or initrd image (a cpio archive file)
a vmlinuz (kernel core file)
a config & System map file.
What is the best practiced way of installing a new kernel package?
The best practiced way of installing a kernel package is using either “yum” or “PackageKit”, not using “rpm” command. Though it is possible to install a new kernel using “rpm” command but not an ideal one due to the following reasons:
User may run an update instead of install i.e “rpm -Uvh” instead of “rpm -ivh” to install package which results in updating existing kernel package, and for some reasons if new kernel doesn’t boot up then there is no way to go back to earlier kernel (not a problem when there more than one older kernel images available). This is not the case when using “yum” command as yum would consider to install a kernel package even if a user runs “yum update kernel”, since a kernel package is a “install-only” package.
When a kernel package is installed using “yum” command, the kernel package creates an entry in the boot loader configuration file for that new kernel.
However, “rpm” command may not configure the new kernel to boot as the default one and this needs to be updated manually.
What are the few precautions or checks that has to followed before loading a new kernel?
Make sure there is enough free space in /boot and /tmp (if /tmp is a separate file system). Keep a check on I-node usage as well by running “df -ih” command.
Initiate a backup of important data & configuration files as a precautionary measure, if there is not a recent backup taken.
It is better to stop all applications running on the system where kernel package update is scheduled.
Which are the important configuration files that system would edit or make modifications during the installation of a kernel package?
Whenever a new kernel package is installed, it would by default modify the file “/boot/grub2/grubenv” and add new entry to the file “/boot/grub2/grub.cfg” (/boot/efi/EFI/redhat/grub.cfg in case of EFI based systems). This is considering that new kernel package installation is always considered as the default which is defined by “UPDATEDEFAULT” parameter in the file “/etc/sysconfig/kernel”.
Also, there is “/etc/grub2.cfg” (grub.conf in case of RHEL6.x and older) which is a symbolic link to “grub.cfg” file. The file “/boot/grub2/grubenv” is set as per the “GRUB_DEFAULT” parameter defined in “/etc/default/grub” file.
In earlier versions (RHEL6.x), there is only one grub configuration file which is “/boot/grub/grub.conf” which gets updated whenever a new kernel is loaded.
Where to look out for error logs in case something goes wrong while loading a new kernel?
- As usual, in Linux systems we could look out for errors/warnings/info related messages in “/var/log/messages” file. By default only ‘info’ and above messages gets logged in this file, so to increase this logging verbosity one could edit the configuration line of “/var/log/messages” in “/etc/rsyslog.conf” file.
Change this line from :
*.info;mail.none;authpriv.none;cron.none /var/log/messages
to
*.debug;mail.none;authpriv.none;cron.none /var/log/messages
After making this change, save and exit the file. Restart the “rsyslogd” service ( ‘systemctl restart rsyslogd.service’ or ‘service rsyslogd restart’ in case of RHEL6.x and older) to make the changes come into effect. NOTE: Keep in mind that this would generate a lot of logs and “/var” may get filled up fast, so after the diagnosis make sure to revert the changes.
- Also, there is “verbose” parameter available when installing a package using “yum” command which could be used to generate more logs that may provide hints when kernel package installation failed. Likewise the “verbose” option is available with many more commands.
Now, let’s see how could we replicate “kernel panic” errors and how to troubleshoot & fix such errors. Below is the “System Environment” details which talks about system being used to replicate this scenario. There are two scenarios that I wish to discuss here, one is “kernel panic after installing a new kernel” & another one is “error message ‘/dev/mapper/rhel-root’ doesn’t exists” .
Scenario 1: Kernel panic
System Environment used to replicate error:
This is a Virtual Machine (VM) running on Oracle Virtual Box.
It is installed with RHEL7.4 with two kernels as shown below (entire post is based on RHEL7.x system, however, wherever possible I’ve mentioned about changes pertaining to earlier releases):
The kernel version “3.10.0-862.14.4.el7.x86_64” is the current kernel.
Replicate kernel panic error So, let’s replicate the issue of kernel panic. To do this, I’ve used the “dd” command to zero some bytes of a working initramfs image file on a test system.
NOTE: I’ve done this ONLY to show/replicate issue, please don’t try this on production systems. Below is the snap of the “dd” command:

After reboot the system become panic as shown in the below snap and failed to load the operating system:

Let’s fix it
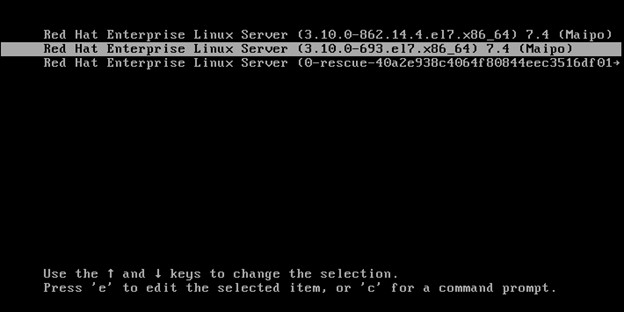
Step 1: Boot into older kernel To fix this, we’d need any older working kernel which could be used to boot up the system. So, reboot the panic node and when kernel countdown timer comes up, hit a key and scroll down and select an older kernel, hit “Enter” key to boot into that kernel as shown below:
Step 2: Verify kernel files
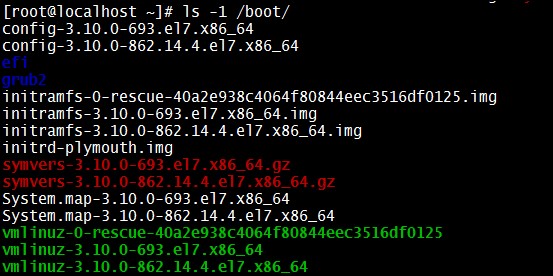
Once the system is up with the previous kernel, navigate to “/boot” directory and check for the presence of the below files corresponding to working and non-working kernel:
initramfs-xx.x.x.x..x.
vmlinuz-x.x.x.x..x
System-map-x.x.x.x..x
symvers-x.x.x.x.x.x
Step 3: Identify corrupted/broken files
Let’s verify the size of each of these files and compare it with a working kernel which would help us to know if there is anything wrong, and which needs to be fixed.

As shown in the above snap, we could see that the file “initramfs-3.10.0-862.14.4.el7.x86_64.img” is smaller compared with a working one which is “initramfs-3.10.0-693.el7.x86_64.img”. But if we compare the kernel image files which are “vmlinuz-3.10.0-862.14.4.el7.x86_64” & “vmlinuz-3.10.0-693.el7.x86_64”, it looks okay.
Also, let’s run the command “lsinitrd” to list out the contents of initramfs image file and see if it shows all the modules, files etc., required.

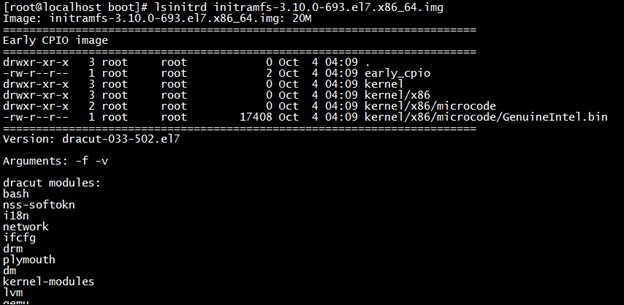
As we could see from the above snap that when I ran “lsinitrd” command on non-working initramfs file it failed to show all modules and files as it did when ran on a working image file.
Step 4: Let’s recreate initramfs image file using dracut command
At this stage, we know that we’ve to recreate the initramfs image file and this can be achieved using the command “dracut” (dracut -fv ) (mkinitrd in case of RHEL5.x and earlier versions) as shown in the below snap: 
Step 5: Verify if the newly created initramfs file is good enough
Now, let’s verify the newly built initramfs image file and check if this is properly built.


The newly built initramfs file “initramfs-3.10.0-862.14.4.el7.x86_64.img” looks good and we should reboot the system and check now. Since this is the default kernel which the system should boot into, we don’t need to change anything in the boot configuration files.
However, let’s verify the default boot kernel. This could be verified by checking for “GRUB_DEFAULT” entry in “/etc/default/grub” file which points to “saved”. So, this would read the saved entry parameter from the file “/boot/grub2/grubenv” file which says that it is set to “3.10.0-693.el7.x86_64” kernel as shown in the below snap:

Let’s reboot the system and check if it boots into default kernel without any issues. Yes, system booted fine without any problems.

NOTE: In some cases the initramfs image file and vmlinuz kernel files looks good, however, system still fails to load and may become panic or throw some other error message. In such situation it is not a bad idea to re-generate new initramfs image file and try reboot and check if that helps.
There may be a situation where some additional drivers/modules to be exclusively included while re-building initramfs image file which could be achieved by using the command :
“dracut -fv <initramfs-image-file> <kernel-version> --add-drivers <driver-name>”
If the situation doesn’t improve even after re-creating initramfs image file, then it is better to re-install the new kernel image which may help to fix any broken files. This could be done using the command:
“yum reinstall <Kernel-Package>”
To identify if additional drivers/modules are exclusively added when a previous initramfs image file was built using the “dracut” command then one could run “lsinitrd |grep -i “arguments” which would show out the arguments passed.
Scenario 2: Error “/dev/mapper/rhel-root” doesn’t exists
Sometimes, after installing a new kernel, everything looks good, however, after a reboot we’d come across an error “/dev/mapper/rhel-root doesn’t exists”. So, let’s see how to resolve such errors.
To replicate the issue I’ve used the same setup as used in “Scenario 1” and error snap is as shown below:
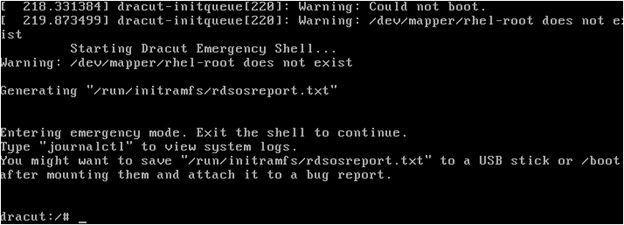
In such scenarios, the system would fail to boot and drops into “dracut” shell. When running “lvm” commands inside “dracut” shell it would throw an error saying “lvm command not found” as shown below:

However, we could see that “/dev/sda1” is a standard partition and “/dev/sda2” being used as back-end device for lvm as per the snap.
How to fix it?
This could be mostly because of the “lvm” filter being set incorrectly which has blocked lvm devices being available for the system. To resolve such issues, reboot the system and select previous working kernel and check out what filters are being set:
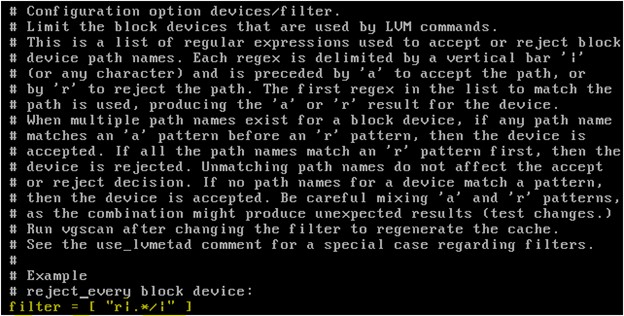
As we could see that the filter has been set to reject all, so let’s correct this to accept. This is just an example, a filter may set differently depending on which devices should be allowed or rejected in lvm.
So, let’s change the filter so that it would accept all devices or any specific devices which are boot and root file systems. We’d need to replace the letter “r” (reject) with “a” (accept), save the changes and rebuild initramfs image file for the non-working kernel.

Now, let’s reboot the system and check if that boots fine into default kernel. That’s it. We are set…. it is working as expected!


